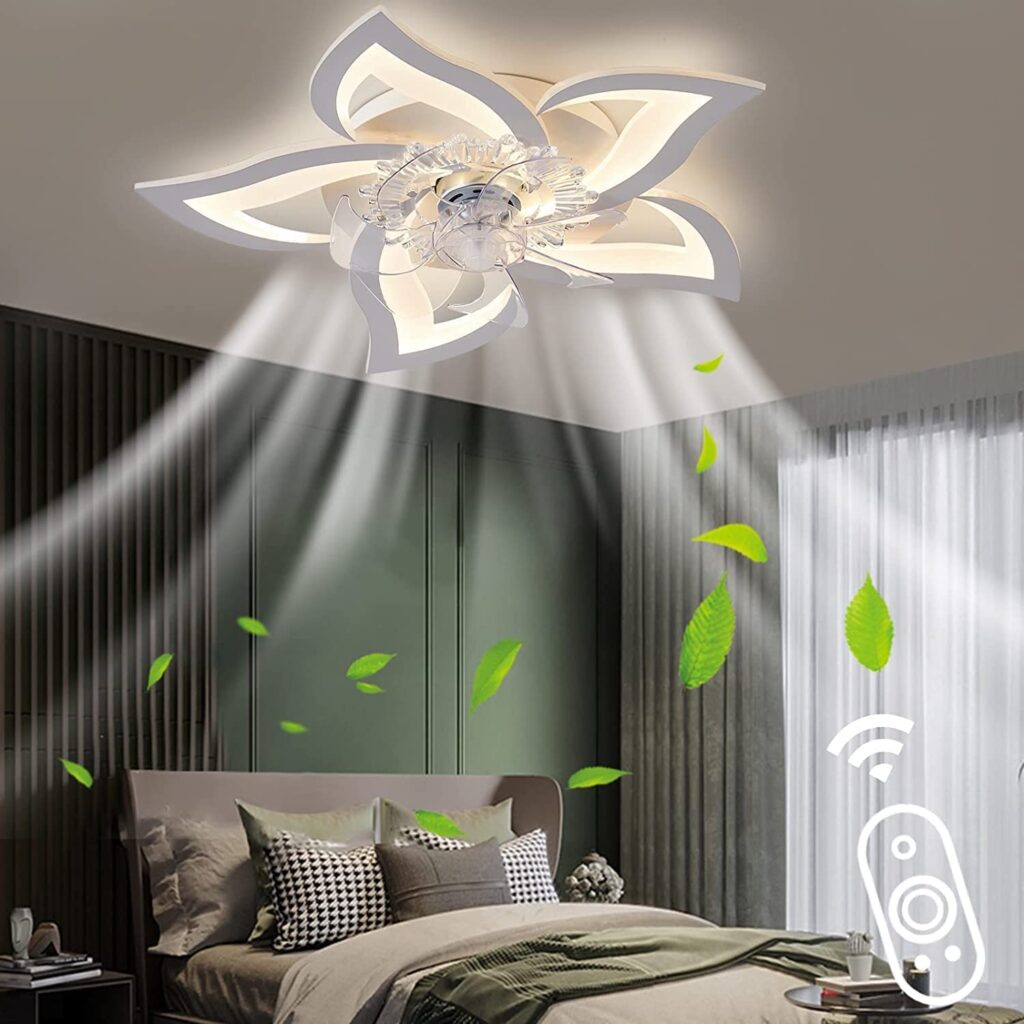
Ceiling fans typically use two types of capacitors: Start Capacitor and Run Capacitor.
Thank you for reading this post, don't forget to subscribe!Start capacitors are used only when the fan is turned on, and they provide an extra jolt of electricity to start the motor. Once the motor is running, the start capacitor is no longer needed.
Run capacitors, on the other hand, are used continuously while the fan is running. They help regulate the electrical current that powers the motor, ensuring that the fan runs smoothly and efficiently.
Both start and run capacitors are typically made of metalized polypropylene film, which is a type of plastic that is coated with metal to provide conductivity. This material is known for its durability and ability to withstand high temperatures.
When replacing a ceiling fan capacitor, it’s important to choose the correct type of capacitor for your specific fan model. Capacitors come in different sizes and capacitance values, so be sure to consult your fan’s manual or a professional electrician to ensure you choose the right replacement.
Which Type of Capacitor is Best for Ceiling Fan? This is a question that is often asked by homeowners who are looking to replace a faulty capacitor in their ceiling fan or are looking to upgrade their ceiling fan’s performance. Capacitors are an essential component of ceiling fans, as they provide the starting torque needed to get the fan blades moving and keep them spinning at the desired speed.
In this article, we will discuss the different types of capacitors that are used in ceiling fans and which one is best for your specific needs.
Electrolytic Capacitors
Electrolytic capacitors are the most common type of capacitor used in ceiling fans. They are usually found in the fan’s motor and are responsible for providing the starting torque needed to get the fan blades moving. Electrolytic capacitors are made of two metal plates separated by an electrolyte. They are known for their high capacitance values, which makes them ideal for use in high-powered applications like ceiling fans.
Ceramic Capacitors
Ceramic capacitors are also used in ceiling fans, but they are not as common as electrolytic capacitors. They are typically used in the fan’s speed control circuit and are responsible for maintaining a steady voltage supply to the motor. Ceramic capacitors are made of two ceramic plates separated by a small amount of air or a ceramic material. They have a lower capacitance value than electrolytic capacitors, but they are more stable over a wide range of temperatures and frequencies.
Film Capacitors
Film capacitors are the least common type of capacitor used in ceiling fans. They are used in the fan’s power factor correction circuit and are responsible for improving the fan’s efficiency. Film capacitors are made of a thin plastic film that is coated with a metal layer on both sides. They have a lower capacitance value than electrolytic capacitors but are more stable over a wide range of temperatures and frequencies.
Generic Capacitor
A generic capacitor is a type of capacitor that is designed to work in a wide range of electronic devices and applications. Unlike specialized capacitors that are designed for specific uses, such as ceiling fan capacitors or motor capacitors, generic capacitors can be used in a variety of circuits and devices.
Generic capacitors come in a range of sizes, shapes, and capacitance values to fit different applications. They are typically made of materials such as ceramic, tantalum, aluminum, or electrolytic film. These materials have different properties that make them suitable for different types of circuits and devices.
One advantage of using a generic capacitor is that they are widely available and can be purchased from many different suppliers. This makes it easy to find a replacement capacitor if one fails in a device or circuit. However, it’s important to choose a capacitor with the correct capacitance value, voltage rating, and other specifications to ensure that it will work properly in the circuit or device.
Overall, generic capacitors are a versatile component that can be used in many different electronic applications. They are an essential part of many circuits and devices, helping to regulate electrical current, store energy, and filter out unwanted signals or noise.
Still Confused on Which Type of Capacitor is Best for Ceiling Fan?
The answer depends on the specific needs of your fan. If you are looking to replace a faulty capacitor, it is best to replace it with the same type of capacitor that was originally installed in the fan. This will ensure that the fan operates as it was designed to and that there are no compatibility issues.
If you are looking to upgrade your fan’s performance, you may want to consider upgrading the capacitor to a higher capacitance value. This can provide a boost in starting torque and help the fan maintain its speed more efficiently. However, it is important to note that not all fans are designed to handle higher capacitance values, so you should consult the fan’s manual or contact the manufacturer before making any upgrades.
Read here for The Top 7 Best Ceiling Fan Capacitors of 2023.
Final Thoughts, electrolytic capacitors are the most common type of capacitor used in ceiling fans, and they are ideal for providing the starting torque needed to get the fan blades moving. Ceramic capacitors are less common but are more stable over a wide range of temperatures and frequencies, making them ideal for use in the fan’s speed control circuit. Film capacitors are the least common type of capacitor used in ceiling fans but can improve the fan’s efficiency when used in the power factor correction circuit.
We hope that this article has helped you understand the different types of capacitors used in ceiling fans and which one is best for your specific needs. If you have any further questions or need assistance with your ceiling fan, don’t hesitate to contact a qualified electrician or the manufacturer of your fan.
Which power capacitor is used in ceiling fan?
Ceiling fans typically use a type of capacitor called an electrolytic capacitor. This type of capacitor is responsible for providing the starting torque needed to get the fan blades moving and keeping them spinning at the desired speed.
Electrolytic capacitors are made of two metal plates separated by an electrolyte and are known for their high capacitance values, which makes them ideal for use in high-powered applications like ceiling fans.
So, if you are looking to replace a faulty capacitor in your ceiling fan, or are looking to upgrade its performance, an electrolytic capacitor is likely the type of capacitor you will need.
What is the standard ceiling fan capacitor?
The standard ceiling fan capacitor typically has a capacitance value ranging from 1 to 5 microfarads (µF). However, the exact capacitance value required for a particular ceiling fan may vary depending on the specific model and its intended use.
In general, larger ceiling fans may require capacitors with higher capacitance values to provide the necessary starting torque and keep the blades spinning at the desired speed. It’s important to note that using a capacitor with an incorrect capacitance value can result in poor performance, motor damage, or even a potential safety hazard.
Therefore, it’s recommended to consult the manufacturer’s specifications or seek professional assistance when selecting a replacement capacitor for your ceiling fan.
What is 2.5 capacitor for fan means?
A 2.5 capacitor for a fan refers to the capacitance value of the capacitor. Capacitance is the ability of a capacitor to store electrical energy, and it is measured in units called farads (F). In the case of a fan capacitor, the capacitance value is typically given in microfarads (µF).
A 2.5 capacitor for a fan has a capacitance value of 2.5 microfarads. This value is commonly used in ceiling fans and other types of fans to regulate the electrical current that powers the motor. The capacitor helps to start the motor and then keeps it running smoothly at the correct speed.
It’s important to choose the correct capacitance value when replacing a fan capacitor. If the capacitance value is too low, the fan may run slowly or not at all. If it’s too high, the fan may run too quickly and may overheat or cause other problems.
In addition to the capacitance value, it’s also important to choose a fan capacitor with the correct voltage rating and other specifications to ensure that it will work properly in the fan. If you’re unsure about which capacitor to use, consult the fan’s manual or a professional electrician for guidance.
What is ceiling fan capacitor value?
This refers to the capacitance of the capacitor used in a ceiling fan. Capacitance is the ability of a capacitor to store electrical energy, and it is measured in units called farads (F). In the case of ceiling fan capacitors, the capacitance value is typically given in microfarads (µF).
The value of the ceiling fan capacitor depends on the specific fan model and its requirements. Ceiling fans can have different capacitor values depending on the size and power of the motor, as well as the desired speed settings.
Typically, ceiling fan capacitors have a capacitance value ranging from 1.5 µF to 5 µF, although some models may require capacitors with values outside of this range. It’s important to choose the correct capacitance value when replacing a ceiling fan capacitor, as using a capacitor with the wrong value can cause the fan to run poorly or not at all.
If you’re unsure about the correct capacitor value for your ceiling fan, consult the fan’s manual or a professional electrician for guidance. They can help you choose the right replacement capacitor for your specific fan model.
Capacitor for fan speed
Capacitors play an important role in regulating the speed of fans, including ceiling fans and other types of fans. Fan speed is controlled by changing the electrical current that powers the fan motor. Capacitors help to regulate this current by storing and releasing electrical energy.
In a ceiling fan, for example, a capacitor is used in conjunction with a fan switch to control the speed of the fan. The capacitor is wired to the fan motor and the switch, and when the switch is turned to a different speed setting, the capacitor releases a different amount of electrical energy to the motor, which changes the fan speed.
The capacitance value of the capacitor used for fan speed control depends on the specific fan model and its requirements. Different fan models may require capacitors with different capacitance values to achieve the desired speed settings.
When replacing a capacitor for speed control, it’s important to choose a capacitor with the correct capacitance value and voltage rating to ensure that it will work properly in the fan. It’s also important to follow proper safety precautions when working with electrical components, including turning off the power to the fan before attempting any repairs or replacements.
Overall, capacitors are an essential component in fan speed control, helping to regulate the electrical current that powers the fan motor and allowing users to adjust the fan speed to their desired level.
What is the capacitor for ceiling fan price?
The price of a capacitor for a ceiling fan can vary depending on the specific model and where it’s purchased. In general, the price can range from a few dollars up to around $20 or more for higher-end capacitors.
Factors that can affect the price of a ceiling fan capacitor include the capacitance value, voltage rating, and other specifications, as well as the brand and retailer. Capacitors with higher capacitance values or specialized specifications may be more expensive than standard capacitors.
When purchasing a ceiling fan capacitor, it’s important to choose a capacitor with the correct specifications for your specific fan model. It’s also important to purchase from a reputable retailer to ensure that you’re getting a high-quality capacitor that will work properly and safely in your fan.
If you’re unsure about the correct capacitor to use for your ceiling fan or where to purchase it, consult the fan’s manual or a professional electrician for guidance. They can help you choose the right capacitor for your specific fan model and ensure that it’s installed safely and correctly.
Learn how to replace your capacitor with our step-by-step guide
Replacing a faulty or damaged capacitor in your ceiling fan can be a cost-effective way to restore its performance without having to replace the entire unit. Here’s a step-by-step guide on how to replace your capacitor:
- Turn off the power supply: Before starting any electrical work, turn off the power supply to your ceiling fan at the circuit breaker or fuse box.
- Remove the fan cover: Remove the screws or clips that hold the fan cover in place and remove it to expose the motor and capacitor.
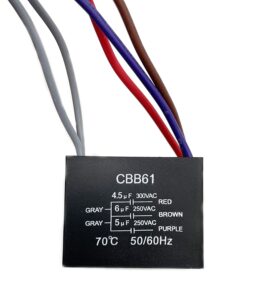
- Identify the capacitor: Locate the capacitor on the motor housing. It will look like a small cylindrical or oval-shaped component with two or three wires attached to it.
- Disconnect the wires: Using a pair of pliers or a screwdriver, carefully disconnect the wires from the capacitor terminals. Make note of which wires connect to which terminals to ensure proper reconnection later.
- Remove the old capacitor: Using a screwdriver or pliers, remove the old capacitor from its mounting bracket or clip.
- Install the new capacitor: Install the new capacitor in the same location as the old capacitor and secure it with its mounting bracket or clip.
- Reconnect the wires: Reconnect the wires to the new capacitor in the same configuration as before.
- Test the fan: Replace the fan cover and turn on the power supply. Test the fan to ensure that it’s running smoothly and at the desired speed.
Replacing the capacitor in your ceiling fan is a relatively simple process that can be completed with basic tools and a little bit of caution. However, if you’re uncomfortable working with electricity or unsure of your ability to safely replace the capacitor, it’s always best to seek professional assistance.
Check out this Video for how to replace your capacitor:
A Beginner’s Guide to Wiring a Ceiling Fan Capacitor
Wiring a ceiling fan capacitor can be intimidating for beginners, but with a little bit of knowledge and practice, it can be easily accomplished. Here’s a beginner’s guide on how to wire a ceiling fan capacitor:
- Turn off the power supply: As with any electrical work, the first step is to turn off the power supply to the ceiling fan at the circuit breaker or fuse box.
- Identify the capacitor: Locate the capacitor on the motor housing. It will look like a small cylindrical or oval-shaped component with two or three wires attached to it.
- Identify the wires: Identify the wires that are connected to the capacitor. They may be color-coded, but if not, make note of which wire is connected to which terminal.
- Disconnect the wires: Using a pair of pliers or a screwdriver, carefully disconnect the wires from the capacitor terminals. Make sure to hold the wires by the insulation and not the exposed copper to avoid electrical shock.
- Identify the terminals: Look closely at the capacitor and identify the terminals. There will be two or three terminals labeled with letters, such as “C,” “F,” and “H.”
- Connect the wires: Connect the wires to the appropriate terminals. The wire connected to the fan motor should be connected to the “F” terminal, while the wire connected to the power supply should be connected to the “C” terminal. If there is a third wire, it should be connected to the “H” terminal.
- Secure the wires: Use a cable tie or wire nut to secure the wires and prevent them from coming loose.
- Test the fan: Turn on the power supply and test the fan to ensure that it’s running smoothly and at the desired speed.
Learn the basics of wiring a ceiling fan capacitor with our beginner’s guide, complete with diagrams and clear instructions.